
Introduction
Easter, a celebration of spring and new beginnings, is synonymous with vibrant, colorful eggs. The tradition of dyeing eggs dates back centuries, representing the rebirth and renewal associated with the holiday. While various methods exist, using vinegar to color eggs is a simple, safe, and effective technique that yields beautiful results. This guide will provide you with a comprehensive understanding of the process, from selecting eggs to achieving vibrant hues, ensuring a memorable Easter egg decorating experience.
Choosing the Right Eggs
The foundation of a successful Easter egg dyeing project lies in selecting the right eggs. Fresh, unwashed eggs are ideal, as their shells are porous and readily absorb the dye. Avoid eggs with cracks or imperfections, as they may leak during the dyeing process.
For a vibrant, even color, white eggs are the preferred choice. Brown eggs, while beautiful in their own right, tend to absorb dye less readily, resulting in a more muted hue. However, with the right techniques, you can still achieve stunning results with brown eggs.
Preparing the Eggs
Before embarking on the dyeing process, it’s essential to prepare the eggs. This involves cleaning them thoroughly to remove any dirt or debris that may hinder dye absorption. Gently wash the eggs with mild soap and water, ensuring to rinse them thoroughly afterwards.
Avoid using harsh detergents or abrasive cleaners, as these can damage the eggshells and affect their color. Once clean, allow the eggs to dry completely before proceeding to the dyeing stage.
The Role of Vinegar
Vinegar plays a crucial role in the egg dyeing process, acting as a mordant. A mordant is a substance that helps the dye adhere to the eggshell, creating a more vibrant and lasting color. Vinegar’s acidic nature opens up the pores in the eggshell, allowing the dye to penetrate deeper and create a more intense hue.
The type of vinegar used is less critical, but white vinegar is generally preferred for its neutral flavor and lack of color. Apple cider vinegar or even lemon juice can be used as substitutes, although they may impart a subtle flavor or scent to the eggs.
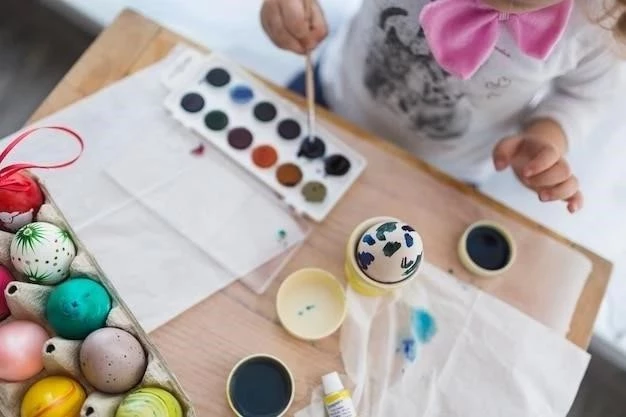
Dyeing Techniques
There are various methods for dyeing eggs with vinegar. The most common and straightforward technique involves creating a dye bath using food coloring and vinegar.
- Preparing the Dye Bath⁚ In a bowl, mix together equal parts of vinegar and water. Add a few drops of food coloring, adjusting the amount to achieve your desired intensity. Experiment with different color combinations to create unique and vibrant patterns. For a more concentrated hue, use a higher ratio of food coloring to water.
- Dyeing the Eggs⁚ Gently place the eggs in the dye bath, ensuring they are fully submerged. Allow the eggs to soak for 15-30 minutes, or until they reach your desired color intensity. For a more vibrant color, consider increasing the soaking time.
- Rinsing and Drying⁚ Once the eggs have achieved their desired color, carefully remove them from the dye bath and rinse them thoroughly under cold water. This removes any excess dye and prevents smudging. Allow the eggs to dry completely before handling them.
For a more intricate and artistic approach, you can try alternative dyeing techniques⁚
- Marbling⁚ Create a swirl of colors in the dye bath by gently dropping different colored dyes into the water. Carefully place the eggs in the swirling dye bath, creating unique patterns.
- Tie-Dyeing⁚ Wrap the eggs in rubber bands or string, creating sections of exposed and covered areas. Dip the eggs into the dye bath, allowing the exposed areas to absorb the color. Remove the bands or string after dyeing for a unique tie-dye effect.
- Decoupage⁚ Cut out shapes from tissue paper, fabric, or other materials. Apply a thin layer of glue to the egg and carefully place the cutouts on the surface, creating a decorative pattern.
Natural Dyeing
For a more natural and eco-friendly approach, consider using natural dyes derived from plants, fruits, and vegetables. These dyes may not be as vibrant as food coloring, but they offer a unique and earthy aesthetic.
Here are some natural dyes you can experiment with⁚
- Red⁚ Beets, cranberries, red cabbage
- Yellow⁚ Turmeric, onion skins, saffron
- Blue⁚ Blueberries, red cabbage (with baking soda), indigo
- Green⁚ Spinach, green tea, chlorophyll
- Brown⁚ Coffee grounds, black tea
To create natural dye baths, simply simmer the chosen ingredient in water for 30-60 minutes, then strain the liquid. Add vinegar to the dye bath, as it helps to set the color. Follow the same dyeing procedure as with food coloring, allowing the eggs to soak in the dye bath until they reach your desired color.
Safety Precautions
While dyeing eggs with vinegar is generally safe, it’s essential to take some precautions to ensure a smooth and enjoyable experience⁚
- Adult Supervision⁚ Always supervise children when dyeing eggs, especially when using sharp objects or hot water.
- Ventilation⁚ Ensure adequate ventilation when working with vinegar, as its fumes can be irritating.
- Gloves⁚ Wear gloves to protect your hands from staining, especially when using vibrant colors.
- Cleanup⁚ Clean up spills promptly to avoid staining surfaces.
Storage and Display
Once the eggs are dry, they can be displayed in various creative ways. You can arrange them in baskets, bowls, or even create a decorative egg tree. To preserve their vibrancy and prevent them from spoiling, consider storing the eggs in a cool, dry place.
Avoid storing them in direct sunlight, as this can fade the colors. You can also coat the eggs with a thin layer of petroleum jelly or cooking oil to help maintain their moisture and prevent them from drying out.
Conclusion
Dyeing Easter eggs with vinegar is a fun and engaging activity for all ages. With a little creativity and the right techniques, you can create a collection of vibrant and unique eggs that will bring joy and color to your Easter celebrations. Remember to choose fresh eggs, prepare them properly, and experiment with different dyeing methods to achieve your desired results.
Whether you opt for traditional food coloring or natural dyes, the process of dyeing eggs with vinegar is a rewarding experience that allows you to embrace the spirit of Easter and create lasting memories. So grab your supplies, gather your family and friends, and embark on a colorful Easter egg dyeing adventure!
Artykuł zawiera kompleksowe informacje na temat barwienia jajek na Wielkanoc z wykorzystaniem octu. Szczegółowe wyjaśnienie roli octu jako środka utrwalającego barwnik jest szczególnie cenne. Autor jasno i przejrzyście przedstawia wszystkie etapy procesu, od wyboru jajek po przygotowanie ich do barwienia. Polecam ten artykuł wszystkim, którzy chcą poznać tradycyjne metody barwienia jajek.
Autor artykułu w sposób kompleksowy i przystępny przedstawia proces barwienia jajek na Wielkanoc. Szczegółowe informacje dotyczące wyboru jajek, ich przygotowania i roli octu są bardzo pomocne. Artykuł jest dobrze napisany i zawiera wiele praktycznych wskazówek. Polecam go wszystkim, którzy chcą poznać tajniki barwienia jajek.
Artykuł jest bardzo przydatny dla osób, które chcą samodzielnie barwić jajka na Wielkanoc. Autor jasno i zwięźle opisuje wszystkie etapy procesu, od wyboru jajek po ich przygotowanie i barwienie. Szczególnie cenne są wskazówki dotyczące użycia octu jako środka utrwalającego barwnik. Polecam ten artykuł wszystkim, którzy chcą uzyskać pięknie wybarwione jajka.
Dobrze napisany artykuł, który w przystępny sposób wyjaśnia proces barwienia jajek na Wielkanoc. Autor skupia się na praktycznych aspektach, takich jak wybór jajek, ich przygotowanie i rola octu. Szczególnie doceniam sekcję poświęconą wyborowi jajek i ich przygotowaniu. Polecam ten artykuł wszystkim, którzy chcą uzyskać pięknie wybarwione jajka.
Dobrze napisany artykuł, który w przystępny sposób wyjaśnia proces barwienia jajek na Wielkanoc. Szczególnie doceniam sekcję poświęconą wyborowi jajek i ich przygotowaniu. Autor podkreśla znaczenie użycia świeżych, niemytych jajek, co jest kluczowe dla uzyskania żywych kolorów. Polecam ten artykuł wszystkim, którzy chcą uzyskać pięknie wybarwione jajka.
Artykuł jest dobrze zorganizowany i zawiera wszystkie niezbędne informacje dotyczące barwienia jajek na Wielkanoc. Autor w jasny i zwięzły sposób opisuje proces, od wyboru jajek po ich przygotowanie i barwienie. Szczególnie cenne są wskazówki dotyczące użycia octu jako środka utrwalającego barwnik. Polecam ten artykuł wszystkim, którzy chcą dowiedzieć się więcej o tradycyjnych metodach barwienia jajek.